
How to Install Solid Hardwood Flooring
Published 10.6.26 | Robbins Flooring Experts
Solid hardwood can last for generations. How well it performs, however, depends heavily on what happens before the first board goes down.
Installing it takes more than a flooring nailer. The subfloor must be clean, dry, flat, and structurally sound. The flooring and subfloor have to reach the right moisture relationship. The installation method, fastener spacing, expansion space, and board direction all shape how the finished floor behaves.
An experienced DIYer can install solid hardwood. But for many homeowners, understanding what the job involves is the best way to decide whether to do it yourself or hire a professional. Either way, it’s about protecting your investment.
Robbins® is a flooring brand of AHF, a Pennsylvania-based flooring manufacturer. The installation requirements in this guide are based on AHF’s instructions for 3/4-inch solid hardwood and apply to Robbins solid hardwood floors. If you purchase flooring from another manufacturer, always follow its specific installation instructions.
“Solid hardwood is a natural material, so a successful installation starts before the first board is fastened. Moisture conditions, the subfloor, and the installation method all influence how that floor will perform over time.”
— Travis Bjorkman, Principal Scientist for Wood, AHF
Key Takeaways
- Solid hardwood requires a clean, dry, flat, structurally sound subfloor. It also needs verified moisture levels, the right installation method, correct fastener spacing, and at least 3/4 inch of expansion space.
- Acclimation is measured, not timed. A hardwood-specific moisture meter tells you when the flooring is ready. Several days on the calendar doesn’t.
- Location matters. AHF’s instructions for 3/4-inch solid hardwood allow on-grade or above-grade installation. They rule out full bathrooms and subfloors with radiant heat.
- Over concrete, add a plywood subfloor.
- Wide planks need extra help. Solid planks 4 inches or wider should be installed with glue assist to reduce seasonal gapping and cupping.
- Most problems start below the surface. Gaps, squeaks, cupping, and lifting usually trace back to moisture, the subfloor, or fastening.
- Protection doesn’t end at installation. Keeping indoor humidity between 30% and 50% helps the floor perform for years.
What Is Required to Install Solid Hardwood Flooring?
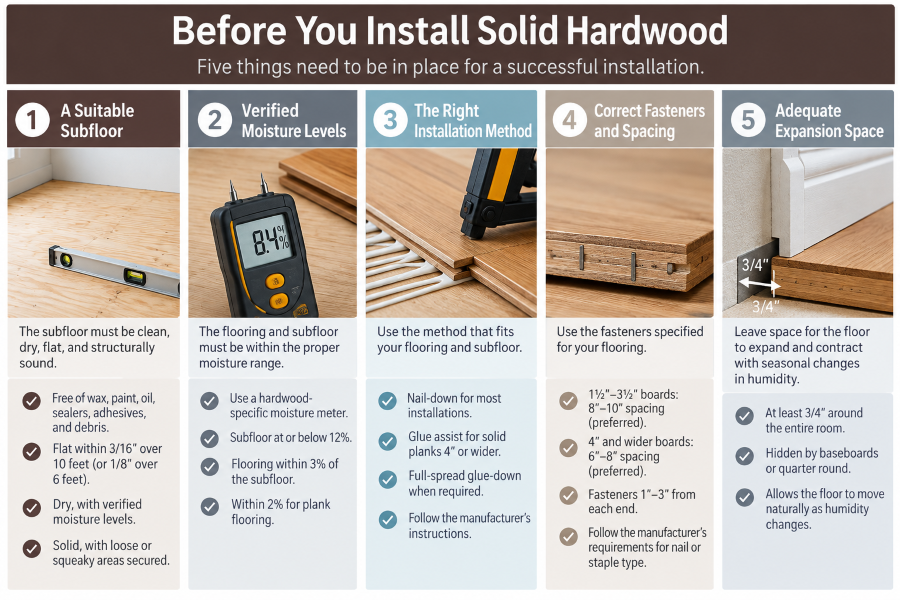
Solid hardwood flooring requires five things:
- A suitable subfloor that is clean, dry, flat, and structurally sound
- Moisture testing that confirms the flooring and subfloor are within the proper range
- An installation method suited to the flooring and subfloor
- Correct fasteners and fastener spacing
- Adequate expansion space around the room
Each requirement is covered below. Before you begin, check the installation instructions for your specific Robbins product and follow them if anything differs.
1. Start With the Right Job-Site Conditions
Hardwood should arrive at a finished environment. Don’t bring it in while the house still has open walls or wet drywall mud.
Before delivering the flooring, the building should be fully enclosed, with windows, doors, siding, roofing, and insulation in place. Concrete, plaster, paint, and other “wet” work should be complete and dry.
The room must be stable. AHF calls for a consistent temperature of 60–80°F and humidity of 30–50%. Those conditions should hold for 14 days before installation, during installation, and until the home is occupied.
Placement matters too.
Solid hardwood can go on grade or above grade, but not below grade. That rules out most basements. Engineered hardwood flooring is better suited to basements as it has some built-in water resistance and is more structurally stable.
You should also avoid installing solid hardwood in bathrooms and over radiant-heated subfloors. Crawl spaces should be at least 18 inches deep, well ventilated, and covered with a polyethylene vapor barrier.
2. Prepare the Subfloor
The subfloor determines how well the finished floor performs. It must be four things:
- Clean: Free of wax, paint, oil, sealers, adhesives, and debris.
- Flat: Within 3/16 inch over 10 feet, or 1/8 inch over 6 feet. Sand down high spots. Build up low spots with builder’s felt, plywood, or shims, not leveling compound.
- Dry: Tested and documented with the appropriate moisture meter.
- Structurally sound: Loose or squeaky areas nailed or screwed down. Replace damaged, swollen, or delaminated panels.
For wood subfloors, the preferred choice is 3/4-inch CDX plywood (5/8-inch minimum) or tongue-and-groove OSB at least 23/32 inch thick.
Can you install hardwood directly on a subfloor?
Yes, if the subfloor meets these requirements. You typically fasten solid hardwood directly to a wood subfloor, often over a moisture barrier.
Can you install solid hardwood over concrete?
Yes, but don’t nail into the slab. Installing a plywood subfloor over the concrete first is highly recommended. Direct glue-down to concrete is possible in some situations, provided you meet the adhesive manufacturer’s requirements.
A bouncy subfloor won’t get better once you put flooring on it. If the floor moves excessively before installation, it will likely keep moving afterward.
3. Test Moisture Before You Call the Flooring Acclimated
Many homeowners are told to leave the boxes in the room for a few days. That misses the point.
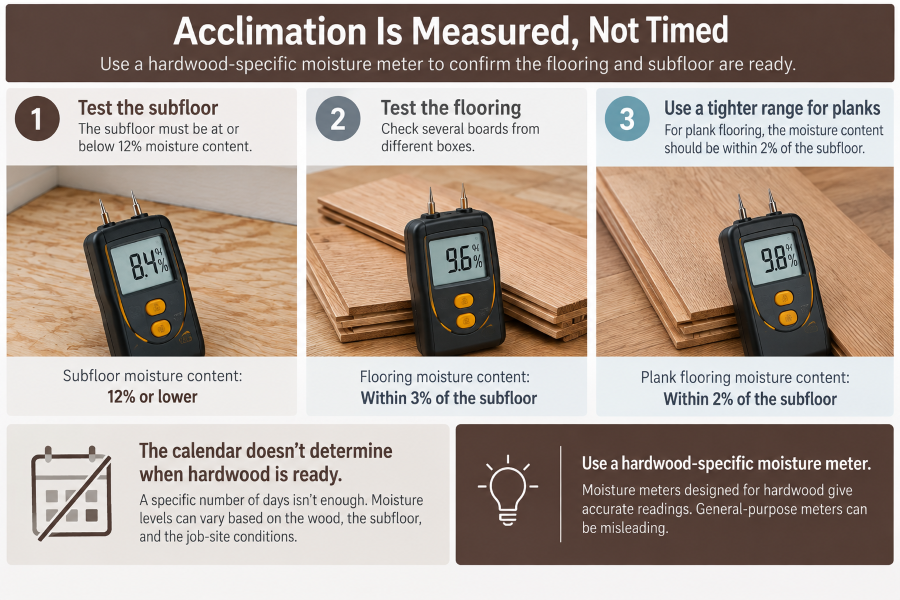
Acclimation isn’t time-based. You verify it with a moisture meter made for hardwood flooring. General-purpose meters can give invalid readings.
The process has two steps:
- Check the subfloor first. A wood subfloor should not exceed 12% moisture content.
- Check the flooring second. Hardwood should be within 3% of the subfloor’s moisture content, or within 2% for plank flooring. Test about 40 boards for every 1,000 square feet. As an aside, anything less than 3” is considered a strip, while anything over that is a plank.
Acclimate the flooring as necessary until it meets those moisture requirements. The calendar doesn’t determine when the flooring is ready.
“People often think acclimation means putting the flooring in the room for a certain number of days. That’s not what matters. You’re trying to bring the flooring and its environment into the proper moisture relationship, and you verify that with a moisture meter.”
— Travis Bjorkman, Principal Scientist for Wood, AHF
4. Decide What Goes Under the Hardwood
Solid hardwood doesn’t need foam underlayment the way many floating floors do. Over a wood subfloor, the more useful layer is usually a moisture barrier.
Laminated rosin paper or 15-pound builder’s felt helps limit movement caused by changes in subfloor moisture. That reduces cupping and warping, and it’s especially helpful over crawl spaces and basements.
Plain kraft paper is different. It supports the racking process before installation and makes boards easier to slide into place.
One important exception. Glue-assist adhesive needs direct contact with the subfloor. It won’t work on top of a moisture barrier.
5. Choose the Right Installation Method
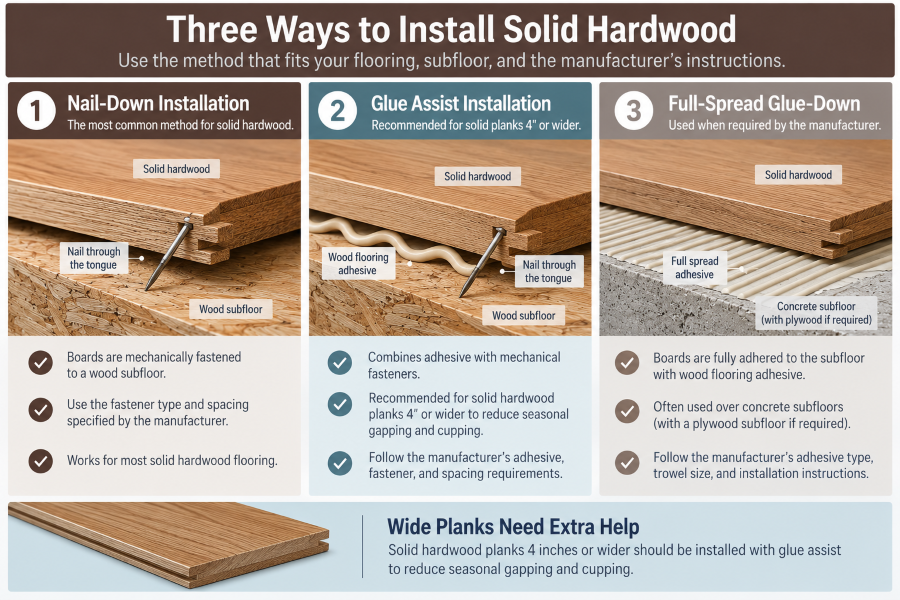
Solid hardwood is installed in one of three ways.
1. Nail-down or staple-down
This is the traditional method. A blind nailer drives cleats or staples through the tongue pocket located directly above the tongue of each board into a wood subfloor, where the next row hides them.
2. Glue assist
For solid planks 4 inches or wider, apply a serpentine bead of premium urethane construction adhesive such as Bruce® Glue-Assist Pro to the back of each board before nailing it. Wider boards move more with the seasons. The adhesive helps reduce seasonal expansion and contraction.
3. Full-spread glue-down
The flooring is set into adhesive spread across the subfloor with a notched trowel. Full-spread glue-down requires additional installation considerations:
- Working time: Varies with porosity, airflow, temperature, and humidity.
- Temperature: Don’t apply adhesive below 60°F.
- Spread rate and transfer: Check both as work progresses.
- Waste: Plan for a 10–15% waste factor, because solid boards have natural curvature.
“Glue-assist installation becomes especially important with wider solid planks because wider boards can show seasonal movement more readily. Used correctly, the adhesive works with the mechanical fasteners to help reduce seasonal gapping and cupping.”
— Travis Bjorkman, Principal Scientist for Wood, AHF
6. Plan the Layout and Board Direction
Here’s a common question about hardwood installation: Which direction should hardwood flooring run?
For the best look, run boards parallel to the longest wall. Structure comes first, though. Boards should run perpendicular to the floor joists unless the subfloor has been reinforced to prevent sagging.
Layout also includes:
- Starting from the straightest wall, usually an exterior wall.
- Blending cartons. Hardwood has no dye lots, so pull from several cartons at once for even color and shade.
- Stagger end joints at least 4–6 inches in adjacent rows, and avoid a uniform “stair-step” pattern.
- Order extra material. Get at least 5% for cutting and grading, 10% for diagonal layouts, and 10–15% for glue-down installations.
7. Leave Room for Expansion
Solid hardwood expands and contracts as humidity changes. The floor needs somewhere to go.
Leave at least 3/4 inch of expansion space around all walls and other vertical obstructions. Baseboards and quarter round cover the gap. Nail those moldings into the wall, not the floor, so the flooring can still move.
Very wide rooms need extra attention. Floors spanning more than 20 feet in humid areas may need added expansion space within the field of the floor.
8. Use the Correct Fasteners and Spacing
Fastening is where equipment and technique matter most. Use a blind nailer designed for 3/4-inch hardwood, with 1-1/2-inch or 2-inch cleats or staples and a protective foot to prevent edge bruising.
Air pressure matters too. Start at 70–75 PSI with an in-line regulator, then adjust until fasteners set correctly. Test on a sacrificial board before you begin.
Spacing depends on board width:
| Board width | Maximum spacing | Preferred spacing |
| 1-1/2″ to 3-1/2″ | 10″–12″ | 8″–10″ |
| 4″ and wider | 8″–10″ | 6″–8″ |
Every board needs at least two fasteners, placed 1–3 inches from each end.
What Can Go Wrong If Solid Hardwood Is Installed Incorrectly?
Installation mistakes don’t always show up right away. Because hardwood responds to moisture and humidity, some problems appear only after the seasons change.
“Many hardwood installation problems don’t start with the flooring itself. They start with moisture conditions, the subfloor, or the installation method. Following the installation requirements means accounting for how real wood behaves before those conditions have a chance to become a problem.”
— Travis Bjorkman, Principal Scientist for Wood, AHF
| Installation issue | What can happen | How to reduce the risk |
| Improper moisture or acclimation | Gaps, squeaks, seasonal movement | Measure flooring and subfloor moisture with a hardwood meter |
| Uneven or unstable subfloor | Movement, noise, poor performance | Confirm it’s clean, dry, flat, and structurally sound |
| Too little expansion space | Restricted movement, buckling | Leave at least 3/4 inch around vertical obstructions |
| Improper fastening | Squeaks, lifting, gapping | Follow the fastener type and spacing schedule |
| Wrong equipment or air pressure | Damaged edges, tongues, or finish | Use a protective foot and a regulated, tested setting |
| Wide planks without glue assist | Seasonal gapping or cupping | Use glue assist for solid planks 4 inches and wider |
Why is my new hardwood floor squeaking?
Common causes include loose subfloor areas, incorrect fastener spacing, and moisture-related movement.
Why is my hardwood cupping?
Moisture conditions and seasonal movement can contribute to cupping. With solid planks 4 inches or wider, glue-assist installation helps reduce seasonal movement, including cupping.
Not following the manufacturer’s instructions can also damage the floor and may void its warranty.
Can You Install Solid Hardwood Flooring Yourself?
Yes, if you have the right skills, tools, and conditions. Solid hardwood is a more demanding DIY project than many floating flooring installations.
DIY may make sense if you:
- Have hands-on flooring or carpentry experience
- Understand how wood responds to moisture, and own or can borrow a hardwood moisture meter
- Have a wood subfloor that already meets flatness and structural requirements
- Can properly set up and operate a blind nailer, compressor, and regulator
- Are working in a straightforward, rectangular room
Beyond the nailer and compressor, expect to need:
- A moisture meter
- A chalk line and tape measure
- Saws for ripping boards and undercutting door jambs
- A pneumatic finish nailer
- Eye protection and a NIOSH-designated dust mask
For wider planks, add construction adhesive.
“DIY installation can look appealing when homeowners are planning a project. The real question isn’t whether you can install the boards. It’s whether you have the tools, experience, and understanding of the job-site conditions to install them correctly and protect the investment you’re making in hardwood.”
— Devon McGrorty, Marketing Manager, AHF
When Should You Hire a Professional Installer?
Consider a professional if your project involves:
- Concrete slabs or subfloors that need additional layers
- Moisture concerns, crawl spaces, or questionable subfloor conditions
- Wide planks or full-spread glue-down installation
- Significant subfloor repair or flattening
- Multiple connected rooms, hallways, or large open spans
- Stairs, diagonal layouts, or unusual room shapes
- No prior flooring installation experience
A professional also brings equipment dialed in from experience. Hardwood is unforgiving of trial and error, which matters most with a premium floor.
Protecting Your Hardwood After Installation
Installation is where protecting your investment starts, not where it ends.
Hardwood stays healthiest when indoor humidity holds between 30% and 50% year-round:
- Heating season: Winter air, wood stoves, and electric heat dry out a home. A humidifier helps prevent excessive shrinkage and gaps.
- Humid months: An air conditioner or dehumidifier keeps moisture in check.
A few other habits help:
- Keep the expansion gap open: Never block the space around the perimeter.
- Protect the surface: Use felt pads or furniture cups, and avoid rolling heavy appliances across the floor.
- Cover it correctly: If you need to protect a new floor during other work, use breathable material like cardboard, never plastic.
This also matters for the warranty. Damage caused by failing to maintain proper humidity isn’t considered a manufacturing issue, and it voids the floor’s warranty.
“Choosing solid hardwood is a long-term investment in your home. Installation isn’t the place where most homeowners want to discover something they didn’t know, and neither is the first dry winter. Understanding how hardwood lives in your home is what keeps it beautiful for decades.”
— Devon McGrorty, Marketing Manager, AHF
Solid Hardwood Installation FAQs
Does solid hardwood need to acclimate before installation?
Yes. Acclimation is complete when moisture readings meet the requirements: the subfloor at 12% or less, and the flooring within 3% of it (2% for plank). The number of days doesn’t determine it.
Do you need underlayment under solid hardwood?
Not in the foam-underlayment sense. Over wood subfloors, laminated rosin paper or 15-pound felt is often used as a moisture retarder. It can reduce movement, sound transfer, and noise. Skip it under glue-assist or glue-down installations, where adhesive needs direct subfloor contact.
Should solid hardwood be glued down?
It can be. The 3/4-inch solid hardwood instructions cover both mechanically fastened and glue-down installations. For solid planks 4 inches or wider, AHF recommends glue-assist installation with mechanical fastening to help reduce seasonal movement.
Can solid hardwood be installed over concrete?
Yes, with the right preparation. A plywood subfloor over the slab is highly recommended. You must also test the concrete for moisture before installation.
Where shouldn’t solid hardwood be installed?
Avoid installing 3/4-inch solid hardwood in:
- below-grade spaces such as most basements
- full bathrooms
- subfloors with radiant heat
How should I prepare my subfloor for hardwood?
Make sure it’s clean and flat to within 3/16 inch over 10 feet. Confirm it’s dry with a moisture meter. Secure loose or squeaky areas, and replace damaged panels.
How much extra flooring should I buy?
Plan for at least 5% extra for cutting and grading. Plan for 10% on diagonal layouts and 10–15% for glue-down installations.
Start With the Right Floor, Then Install It the Right Way
Robbins solid hardwood is made to be lived on for generations. Getting there starts with a floor that suits your space and an installation that respects how real wood behaves. Whether you install it yourself or work with a professional, follow the installation instructions for your specific Robbins product. Those instructions remain the final word on your floor.
Explore Robbins full line of solid hardwoods or stop by a local retailer to view the collections in person.