
Why You Can’t Rush a Flooring Installation
Published August 21, 2026 / Robbins® Flooring Expert
After you’ve gone through the often lengthy process of choosing your flooring, everyone asks the same question: how long will this take?
It’s the wrong question, or at least an incomplete one. The more useful version is: why does it take that long? Once you understand where the time actually goes, the schedule stops feeling arbitrary and starts making sense.
Every flooring material has its own requirements. Wood exchanges moisture with the surrounding air, adhesives cure through chemical reactions, concrete releases water vapor for years, and tile installations rely on mortars that must cure properly.
You’re not waiting on the crew. You’re waiting on materials, and that’s what materials do. So, every step that looks like a delay is usually the step that prevents a failure two years from now.
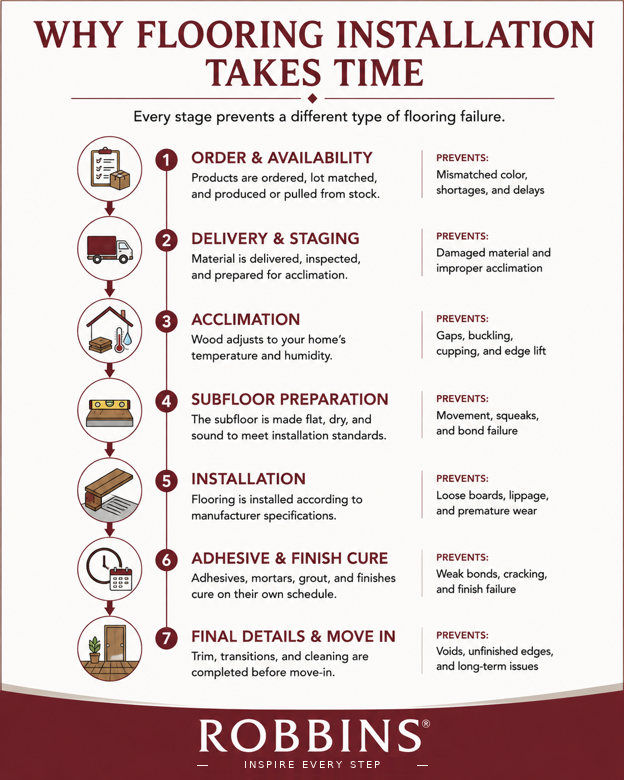
The Clock Started Weeks Before Anyone Arrived
Most people mark the start of installation as the morning the truck pulls up. By then, several weeks of the timeline are already spent.
Ordering and Availability
In-stock colors ship quickly. Special orders don’t. Some products are made to order, and a retailer can’t accelerate a manufacturing run.
Lot Matching
Flooring is produced in batches, and batches vary — slightly different color, slightly different grain characteristics. Connected rooms should come from a single lot, meaning the full quantity must be available together. If your order needs 22 cartons and the warehouse has 18 from one lot, waiting for the rest is the right call. Mixing lots may be visible on the floor.
The Professional Measure
A firm quote requires accurate measurements and a subfloor assessment, which requires someone in your house. That visit gets scheduled, performed, and turned into a revised estimate.
Delivery and Staging
Material arrives, gets inspected against the order, and, depending on the product, starts acclimating.
None of this is dead time. It’s the part of the project that determines whether the floor that goes down is the right material, in the right quantity, matched to itself.
Wood Doesn’t Stop Being Wood
Here’s the step homeowners find hardest to accept. But it’s the one with the most physics behind it.
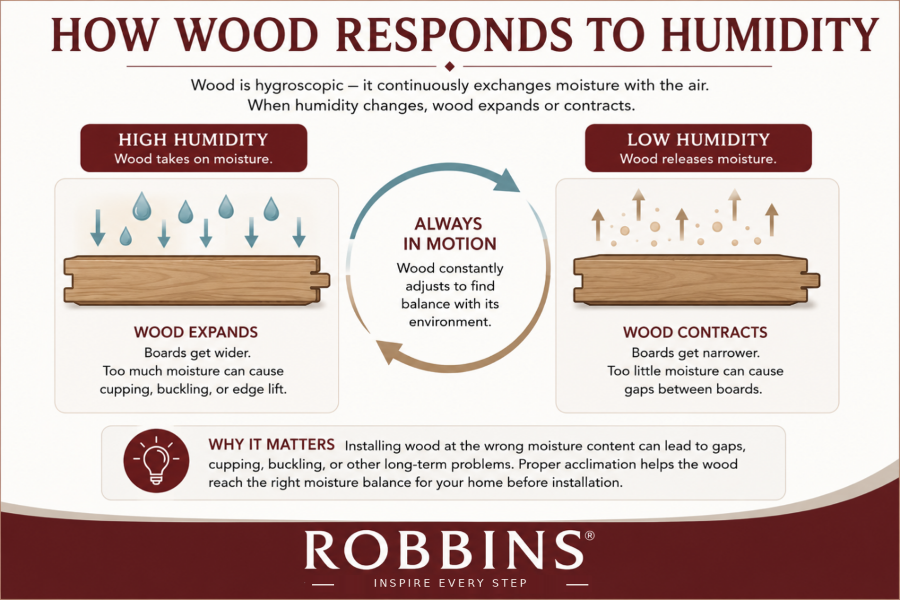
Wood is hygroscopic. That means it continuously exchanges moisture with the surrounding air for as long as it exists. When the air is humid, wood takes on moisture and swells. When the air is dry, it releases moisture and shrinks. It never stops doing this. A hundred-year-old floor is still doing it today.
Eventually, wood reaches a balance point with its environment — a moisture content where it’s neither gaining nor losing. That’s equilibrium moisture content, and it isn’t a universal number. It depends on the temperature and relative humidity of the specific room the wood is sitting in. A board that’s stable in a humid coastal house would be several percentage points wetter than one that’s stable in a dry inland one.
Why Acclimation is Essential
Here’s why that matters on your installation date. Flooring arrives carrying the moisture content of wherever it’s been, such as a mill, a warehouse, or a truck. Your house has its own conditions. If those don’t match, the wood will move after it’s installed:
Installed too wet: The boards release moisture, shrink, and pull away from each other. You get gaps between boards that show up a few weeks or months later.
Installed too dry: The boards take on moisture, expand, and run out of room. That produces cupping, edge lift, or, in the worst case, buckling, where a section lifts off the subfloor entirely.
Acclimation is the process of allowing the flooring to sit in the rooms where it will be installed at normal living temperatures and humidity until its moisture content reaches the proper level. It typically takes a few days, sometimes longer, and the manufacturer’s instructions set the requirement.
Requirements for Acclimation
Two conditions must be met for it to work. The house has to be at normal living conditions. For example, an unheated house mid-renovation is not, and acclimating to conditions you won’t maintain accomplishes nothing. Additionally, the material has to be in the rooms themselves. A stack in the garage is acclimating to the garage.
Installers may also measure moisture content directly, on both the flooring and the subfloor. Many manufacturers specify a maximum difference between the two. When those numbers aren’t in range, the correct move is to wait. It’s also the move that gets read as a delay.
Resilient Products Are Different
Luxury vinyl plank, rigid core, and laminate are engineered for dimensional stability and don’t exchange moisture the way wood does. Most need only 24 to 48 hours in the space, primarily to normalize temperature. The requirement is shorter, but it isn’t zero.
Taking the Old Floor Out Is Often the Slower Half
People expect the new floor to be the time-consuming part. Frequently it’s the removal.
Carpet and pad are the easy route: cut, roll, haul, and pull the tack strip.
Glue-down vinyl or sheet goods can be brutal. The material comes up in pieces, and the adhesive stays behind. Removing residual adhesive means scraping, sometimes grinding, and it’s slow, physical, dusty work.
Tile is usually the most labor-intensive. Every tile has to be broken out, and the thinset underneath has to be removed. That involves mortar bonded to the subfloor, removed by hand or with a grinder. A tile floor can take longer to remove than a wood floor takes to install.
Nailed or stapled wood comes up in pieces, and every fastener left behind has to be pulled or set below the surface. Miss one and it telegraphs through the new floor.
Then there’s what’s underneath. Old houses often have layers—for example, vinyl over hardboard over another vinyl over the original subfloor. Nobody knows how many until the demolition starts.
This is the phase most likely to run past its estimate. But it’s the phase that has to be finished. A new floor installed over residual adhesive or a proud fastener will have problems that trace directly to shortcuts taken here.
The Subfloor Is the Part Nobody Can Quote in Advance
Everything you’re paying for attaches to a layer you can’t see until the old floor is gone.
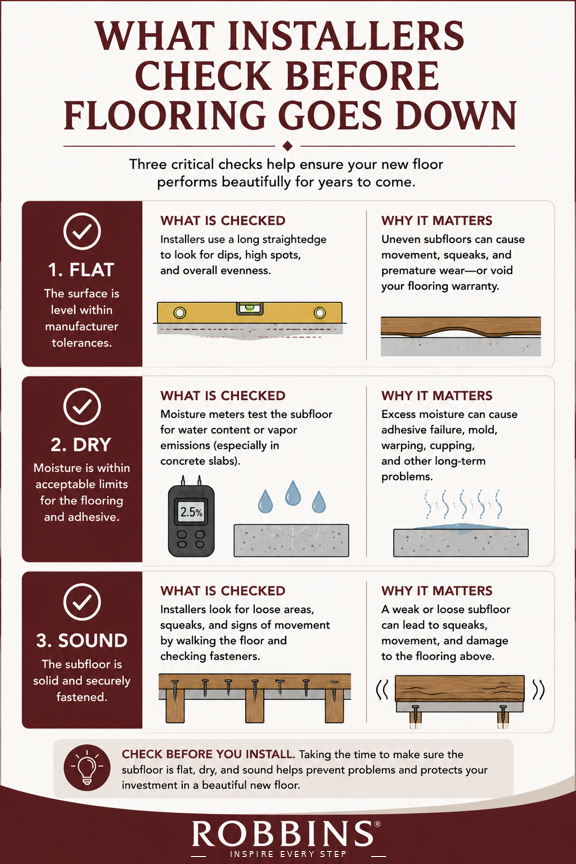
The subfloor is the structural surface underneath — plywood or OSB over joists, or a concrete slab. Its condition determines whether the finished floor performs, and installers check it against three requirements before anything goes down.
Flatness
Manufacturers specify a tolerance, commonly something like 3/16 of an inch over ten feet. That isn’t a preference. A floating floor over an out-of-tolerance subfloor flexes at every low spot. That flexing works the locking system until joints separate. That failure appears months later and gets blamed on the flooring.
Glue-down products lose adhesive contact over voids. Nail-down wood develops squeaks and hollow spots. Tile cracks outright because rigid material over a moving substrate has nowhere to put the stress.
Different products carry different tolerances. Tile is the least forgiving; some floating products are the most. But every product has a limit, and correcting a subfloor means grinding high spots or applying self-leveling compound. Keep in mind that compound has to cure before anyone can work on it.
Dryness
Concrete releases moisture vapor for years, sometimes for the life of the slab. That vapor moves upward into whatever sits on top. Moisture testing exists because you can’t guess the number. It’s why some products require a vapor barrier over concrete regardless of how dry the slab looks.
Wood subfloors have their own limits, and the acceptable gap between subfloor moisture and flooring moisture is often specified.
Soundness
Loose panels, inadequate fastening, water-damaged plywood, delaminated OSB. None of it can be fixed by covering it up. Rot near exterior doors, windows, and bathrooms is common enough that experienced installers half-expect it.
Discovery Happens on Installation Day
A pre-installation measure catches what’s visible. The rest is hidden under the floor you’re removing. When installers find soft plywood or a slab that’s an inch out of level across a room, the process stops. Installers must document the repair, price it, wait for your decision, and then proceed.
That pause is the system working. The alternative, laying a finished floor over a compromised subfloor, doesn’t solve anything. It invisibly transfers the problem to you and usually voids the warranty.
Adhesives Cure. They Don’t Dry.
There’s a meaningful difference, and it explains a wait that frustrates people more than any other.
Drying is evaporation. That means the solvent leaves, and the material hardens. Curing is a chemical reaction. The adhesive’s components react and cross-link into a solid. That reaction proceeds at a rate set by its chemistry, the temperature, and the room’s humidity.
You can’t speed it up by wanting it faster. Fans don’t help the way people assume. In some cases, they treat the surface while the underlying material remains uncured. High humidity slows some adhesives and accelerates others. Cold slows nearly all of them.
Curing Takes Time
In practice, this means that after a glue-down floor is installed, it needs time to take traffic. It needs even more time before it takes heavy furniture. Load it too early, and you shift boards while the bond is still forming. That produces movement, hollow spots, and gaps that don’t appear until later.
Site-applied finishes work the same way. A finish that’s dry to the touch isn’t cured. Full hardness can take days to weeks depending on the product. That’s why site-finished floors carry a staged schedule: socks first, then shoes, then furniture, then rugs.
Prefinished flooring, which makes up most of what’s sold today, is finished under factory conditions and skips this entirely.
Sometimes the Crew Stops Working, and That’s the Good Outcome
A paused job looks disorganized. Usually it’s the opposite.
The moisture test comes back above the manufacturer’s limit, so the slab needs time to dry or a mitigation system needs to be installed. Self-leveling compound goes down and has to cure before anything can be fastened to it. Adhesive from an earlier phase needs its window before the next phase starts. Subfloor repair reveals more than expected, and the schedule genuinely changes.
In each case, the crew has a choice: wait, or proceed anyway.
A crew that keeps working through a failed moisture test is not being efficient. They’re transferring a known risk onto your floor and off their schedule. The pause is a decision to build it correctly, and it’s the version you want.
Ask about it in advance. How are issues communicated? Does work stop for your approval? How does additional work get priced? Knowing the answer beforehand turns an alarming phone call into an expected one.
Installation Issues That Slow the Process
| What They Find | Why They Wait |
| Moisture | Prevent flooring failure |
| Uneven subfloor | Prevent movement & squeaks |
| Hidden damage | Prevent structural issues |
| Adhesive curing | Build full bond strength |
Why the Last Day Looks Like Nothing Is Happening
By the final day, the floor is down, and the visible work appears finished. The crew is still there, and it can feel like they’re stretching it out.
They aren’t. The last phase is detail work, and it’s most of the difference between a floor that looks installed and one that looks finished:
- Transitions and thresholds set at every doorway and change in material
- Reducers where the new floor meets a lower surface
- Stair nosings, which are precision work
- Baseboards or quarter round reinstalled and fitted
- Gaps caulked, nail holes filled, touch-ups applied
- Doors rehung and trimmed if the new floor sits higher
- Vents and registers reset
- Debris removed and the floor cleaned
- The walkthrough with you
None of it is fast. But all of it is what you’ll notice for the next twenty years. Rushed transitions come loose. A door that drags gets worse. Trim gaps never stop being visible.
What Actually Shortens a Timeline
Some things genuinely compress the schedule. They aren’t the things people try.
The Biggest Factor Is the Flooring Material Itself
Different products have different installation requirements. Prefinished hardwood eliminates sanding and finish curing. Luxury vinyl plank and laminate often install more quickly because they don’t require the same curing process as site-finished wood. Porcelain tile installations typically take longer because mortars and grout need time to cure between stages. The material you choose sets the baseline timeline before the first plank or tile is installed.
Apart from that, here are other considerations to accelerate an installation schedule:
- Choose an in-stock color—the single biggest lever. Special orders and made-to-order runs add weeks nobody can shorten.
- Choose prefinished over site-finished. Eliminates the entire sanding-and-curing sequence.
- Get the professional measure done early. It’s a prerequisite for the firm quote and the order.
- Clear the rooms yourself. A crew that arrives to empty rooms starts installing instead of moving furniture.
- Confirm appliance disconnection in advance. This is the most common morning-of delay.
- Make decisions before installation day. Layout direction, transition style, trim choices. A crew waiting on a decision is a crew not working.
- Be reachable. Discoveries need an answer. Every hour you’re unreachable counts against your schedule.
- Keep the house in normal living condition during acclimation. Otherwise, the acclimation period accomplishes nothing and has to be restarted.
What isn’t on this list? Pressuring the crew to skip steps. Every step that could be skipped prevents a specific failure, and the failure always costs more than the wait.
A Floor Built on the Material’s Terms
Flooring installation isn’t slow because installers are inefficient. It’s deliberate because wood, adhesives, concrete, and finishes each operate on their own timetable. Respecting those timetables produces a floor that lasts decades, rather than one that fails in year three.
The waiting isn’t wasted time. It’s the part of the process you can’t see, doing the work that makes everything you can see hold up.
If you’re earlier in the process, our guide to what to expect when you visit a flooring retailer covers how the buying conversation works and what to have ready.
Find a Robbins® retailer near you when you’re ready to begin.
Frequently Asked Questions About Flooring Installation
Why does flooring installation take so long?
Most of the timeline is material behavior, not labor. Wood needs to acclimate to your home’s humidity. Adhesives cure on a chemical schedule. Concrete releases moisture that has to be tested for. You can’t assess subfloor conditions until the old floor is removed.
Why does hardwood flooring need to acclimate?
Wood exchanges moisture with the surrounding air until it reaches equilibrium. Flooring installed at the wrong moisture content will shrink and gap, or expand and cup, after it’s fastened down. Acclimation lets the material balance with your home’s conditions first.
How long does hardwood flooring need to acclimate?
It depends on the product and the difference between the flooring’s moisture content and your home’s conditions. Commonly, a few days, sometimes longer. The manufacturer’s instructions set the requirement, and following them is typically a warranty condition.
Why is removing old flooring so slow?
Tile requires breaking out each piece and removing the thinset underneath. Glue-down vinyl leaves adhesive that has to be scraped or ground off. Old homes often have multiple layers nobody knows about until demolition starts.
What happens if the subfloor isn’t flat?
Out-of-tolerance subfloors cause flexing, hollow spots, and squeaks; they stress floating-floor locking systems until joints separate and can crack tile. Correcting it means grinding or applying self-leveling compound, which then needs time to cure.
Why can’t installers work around subfloor problems?
Covering a compromised subfloor doesn’t fix it. It hides it under a new floor and typically voids the manufacturer’s warranty. The problem surfaces later as movement, gaps, or failed joints.
Why does adhesive take so long to set?
Flooring adhesives cure through a chemical reaction rather than simply drying. The formulation, the temperature, and the humidity set the rate. Loading the floor before the bond has formed shifts boards and creates lasting problems.
Why did my installers stop working?
Usually because a material or condition requires it — a moisture reading above the allowable limit, leveling compound curing, or a subfloor discovery awaiting your decision. A crew that works through those conditions is transferring risk onto your floor.
What can I do to speed up my flooring installation?
Choose an in-stock, prefinished product. Schedule the professional measure early. Clear the rooms yourself. Confirm appliance disconnection in advance. Make layout decisions before installation day. Stay reachable for questions.